Technology Blog
技術ブログ
2018.06.29
Unity3Dタイルマップ作成時の注意点

Unity3D has a tile map system that allows you to make 2D maps with no programming at all. This tool is available for free with the unity base package and can be expanded with the 2D extras package found in unity’s GitHub. It’s fairly easy to use but if you are not careful when setting it up you could have a hard time.
Unity3Dのタイルマップはプログラミングなしで簡単2Dのマップを作れるツールです。このツールはUnity3Dのベースパッケージに入ってて、UnityのGitHubにある2D-extrasのパッケージで機能拡張できます。使いやすいものですがセットアップで間違えると痛い目に会います。
On this post I will be going through a couple details that you should take in account when making your tile map.
このポストでは、タイルマップを作っている時の4つの注意点をあげます。
1.スプライトシート
Tiles usually come in sprite sheets. A sprite sheet is an image containing a series of smaller images most commonly of the same size and organized in columns and rows.
普段はタイルがスプライトシートにあります。スプライトシートというのは小さくて同じサイズの複数のイメージが含められているのイメージをさします。

After importing a sprite sheet into your project. Unity allows you to divide the sheet into individual tiles. To do this you click on the sprite sheet and look at the inspector, the texture type should be “Sprite (2D and UI)” and the sprite mode set to “Multiple”. To start the division process click on the Sprite Editor button. During this process there are a couple factors you should take in account:
Unityにインポートをして選択されたままにInspectorで複数のイメージにスライスが可能です。このプロセスに注意点が二つあります。
- Pixels per unit : Before even going into the Sprite Editor make sure that the value of the “Pixels Per Unit” parameter on the inspector is the same size of your tiles. E.g: if your sheet is holding 64×64 px tiles then make the “Pixels per unit” 64. If you forget this step your tiles will have padding or overlap each other.
- Pixels Per Unit: 「Sprite Editor」に入る前に「Pixels Per Unit」のパラメータがタイルのピクセルサイズと同じにしないといけません。例えばスプライトシートに64px✖64pxのタイルが入ってたら、「Pixels Per Unit」を64に設定してください。設定が違うとパディングがはいったり、タイルが重なったりします。
- Pivot: When using the slice tool in the Sprite Editor. Make sure to set the pivot to “center”. If you miss this step the tiles will be offset from the grid in the scene.
- Pivot: スライスツールを作っているときに、「Pivot」のパラメータが「Center」を選択しないと、タイルがシーンのグリッドからオフセットされます。
2.コライダー
Sprites are just the visual part of our tiles. Without colliders, even if we can see the ground, our characters would just fall off the world. Unity made it very easy to add colliders to your grid. Just select the tilemap and add a “Tilemap Collider 2D” component to it. This is fast and easy but it creates a collider for every tile with a sprite on it. This means that even tiles surrounded by other tiles that will never be in contact with anything will also have a collider. I.e: A lot of unnecessary colliders that will never be used and use resources are being created.
スプライトはタイルの見た目だけのものなのでコライダーを付けないと、床を見えても、キャラクターが突き抜けて落ちます。コライダーを付けるのは簡単にできます。Tilemapのオブジェクトに「Tilemap Collider 2D」というコンポーネントを付けることで付けますが、これで全てのタイルにコライダーが適用されてしまいます。言い換えるならば一回も使わない無駄なコライダーが生成されてリソースを余分に使っています。

To prevent this, we can add an other component. The “Composite Collider 2D” component. This component requires a little bit of setup. When this component is added to your tilemap GameObject, it automatically adds a RigidBody2D component to the object. If you are adding collision to static objects like the ground or a wall, make sure to set the “Body Type” of the RigidBody2D component to “Static” or it will fall down with gravity. Now go back to your “Tilemap Collider 2D” component and tick on the “Used By Composite” box. This will merge you colliders leaving only the outer colliders.
これを防ぐためもう一個のコンポネントを付けられます。「Composite Collider 2D」というコンポネントです。追加するときに自動でRigidBody2Dが追加されます。もし動かない物のコライダーを作っているときに(床、壁、など)RigidBody2Dの「Body Type」を「Static」にしないと重力で落ちます。最後に「Tilemap Collider 2D」の「Used By Composite」を選択することで内側の無駄なコライダーがなくなります。

3.Rule Tiles:
Rule tiles are part of the “2D extras” package you can find in Unity’s GitHub (https://github.com/Unity-Technologies/2d-extras).
UnityのGitHubの”2D-extras”のパッケージにRule Tilesという物があります。(https://github.com/Unity-Technologies/2d-extras).
This tiles can save you a lot of time when map designing, by allowing you to create a set of rules for which sprite is displayed depending on the tiles around it.
このタイルのルールを設定するとマップをつくる際にタイルのスプライトを周りにあるタイルを見て設定されるので、これレベルデザインの時間を節約できます。

Rule tiles also make it easy to create tile animations.
そして、タイルアニメーションもつくれます。

One thing to take care of when setting up this rules is the order you add them to the list. When unity is checking your list of rules it stops and selects the first sprite that fulfills the rule. So if you have a more specific set of rules after a very general one, it might be ignored.
ルールを設定するときの注意点はルールの順番です。Unityがチェックするたびに先にルールに一致するスプライトが選択され、残っているルールを無視します。つまり、幅広いルールを持っているスプライトの次に細かいルールを適用するものがあった場合、幅広いルールに合致して、細かいルールが無視される可能性が高いです。


Getting the tiles to work as you intend them to, might take some time but once you have it set up, it will speed up your map making time. And if you decide to change a sprite midway through the map design, you can just change the sprite for that rule without having to touch the tiles in the scene. A good rule of thumb is to keep the tiles with very specific rules at the top of the list and the more general ones at the bottom. And remember you can drag the rules up and down within the list to change the order easily.
思った通りに設定するには時間がかかるかもしれませんが、一度設定したら、マップ作りがスピードアップします。そして途中でタイルのスプライトを変更したい場合もシーンにあるタイルを作り直しは必要ないです。そのルールのスプライトを変更することで済みます。経験を積んだら設定時間も減ります。ヒントとしては細かいルールを幅広いルールより先に付けること。リスト内での順番がドラッグで簡単に変更できます。
4.レイヤー:
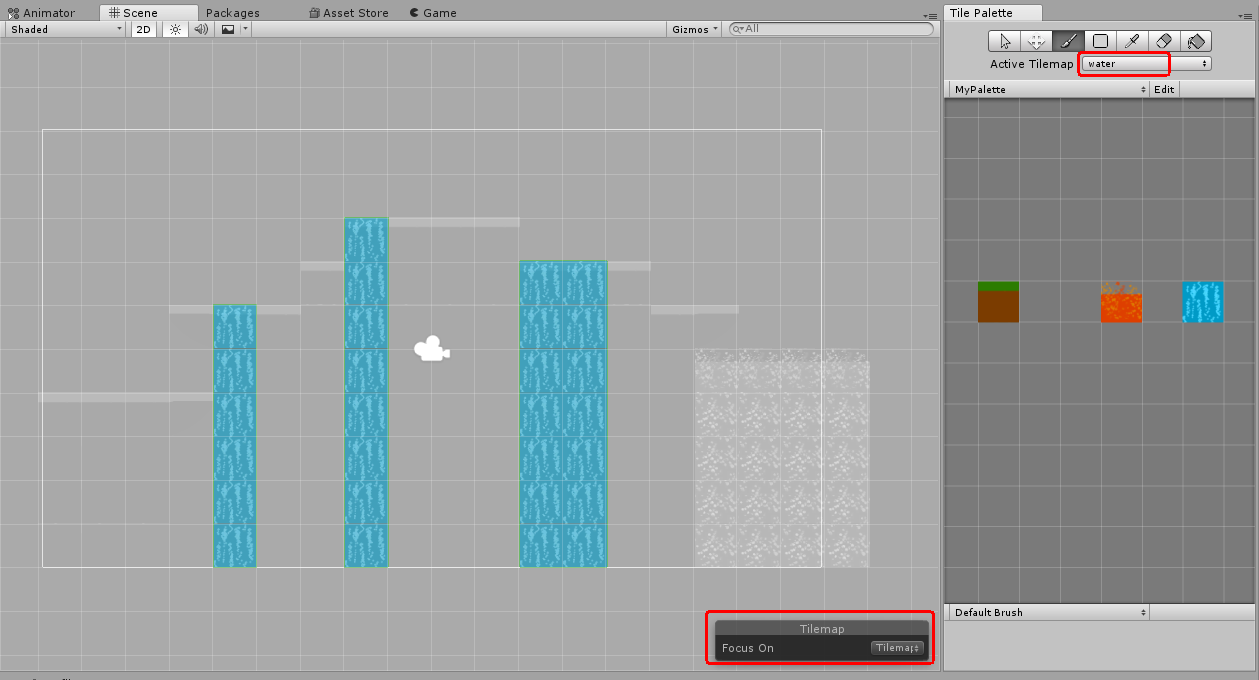
Layers are powerful tools that help us keep rendering orders separate, make pretty overlaps and set colliders to some objects while ignoring others. But it’s important you keep track of the layer you are working on at all times, because just as any other software that uses layers like Photoshop or Gimp, editing the wrong layer will cause you problems. So if you run into some weird behavior like colliding into clouds, falling through the ground or tiles not animating correctly, make sure you check everything is on the right layer. To help you with this Unity has an option to gray out all layers except the one you are working on. This option can be turned on by changing the “Focus On” parameter located on the Scene window to “Tilemap“.
レイヤーは非常に便利なツールでレンダリング順を設定するのに役立ちますが、PhotoshopやGimpのように間違えたレイヤーに間違えたタイルを入れるミスは起こりやすいので気を付けないといけません。雲にぶつかったり、床を突き抜けたり、タイルアニメーションが変になったりしていた場合は、レイヤーに正しくアサインされているかの確認をおすすめします。レイヤーに関するトラブルを防ぐためにUnityには変更中のレイヤー以外のレイヤーをグレーアウトする機能を持っています。シーンにあるの「Focus On」パラメータを「Tilemap」に変更することで起動されます。
